
Choosing the right microphone for a recording session relies on a solid knowledge of microphone types, characteristics, and features. This guide will walk you through all the basics you need to know to pick the right mic for the job, and also help you when you’re looking to buy mics for your studio.
This Beginner’s Guide to Buying Microphones For Your Home Studio article is a comprehensive online resource for learning all about the different types of microphones, their uses and characteristics, and how to choose the right mics for your home studio recordings.
Because, for acoustic instrumental and vocal recordings, the mic is where it all starts!
It is the one fundamental item that captures the performance, sound and personality of an instrument or vocal performance and conveys that to the listener.
There are three things that are important in capturing sounds with a microphone:
Understanding how these three factors interact will allow you to choose the right mic before you hit the record button. And this can make the difference between a mediocre recording and a stellar one.
Let’s get started!
Check out my complete series of microphone articles:
First off, choosing the right microphone involves understanding the different types, designs, and features that are available.
But what exactly is a microphone anyway?
A microphone is basically a transducer, a device that converts acoustic energy (what we know as sound) into electrical energy.
This electrical energy, also known as the audio signal, is processed through an amplifier to be able to be heard through a speaker.
Speakers are also transducers – they convert electrical energy back into acoustic energy, the reverse process of a microphone.
Fun Fact – Speakers, or even headphones, can act as microphones!
How To Use Headphones As A Microphone Easily!
There are three main types of microphones used in recording studios:
It’s frequently asked if USB mics are a fourth type of pic. A USB mic isn’t a different type of mic, but rather a mic that connects to a computer or tablet directly through a USB port, or through a USB audio interface.
USB mics are almost always either dynamic or condenser mics.
Shure SM57 dynamic mic
Dynamic mics have three major components: a diaphragm (also known as a membrane), a voice coil attached to the diaphragm, and a magnet that surrounds the coil.
Without getting too technical, sound entering the microphone causes the diaphragm with its attached coil to move in relation to the sound entering the mic. The surrounding magnet causes the coil to create electrical energy.
Because the coil moves with the sound waves, dynamic mics are also known as moving-coil mics.
Dynamic mics are known for their reliability, long life and their ability to withstand high volume levels (SPLs).
Dynamic mics usually color the sound a bit, especially in the 5 kHz to 10 kHz range. This frequency range adds clarity and presence, which explains why dynamic mics work so well on many instruments and vocalists.
Studio owners love them because they are quite inexpensive compared to other types of mics. The very popular Shure SM57 and SM58 mics are industry standards for instrumental and vocal uses, and both retail for about $99.00 each.
And finally, dynamic mics do not require batteries or an external power supply like condenser or ribbon mics do.
Dynamic mics work well for close-miking vocals and instruments where you do not want to capture any room ambiance.
They are popular first choices for:
Neumann U87 condenser mic
A condenser mic work on a different principle than a dynamic mic.
It uses a condenser, also known as a capacitor, to convert acoustic energy into electrical energy.
Without getting too technical, this capacitor has two plates, one of which acts like the diaphragm in a dynamic mic.
The diaphragm vibrates when sound hits it, and this changes the distance or capacitance between the two plates, creating an electrical signal.
Condenser mics are prized for their natural, clear, accurate and transparent sound, as well as their flat frequency response with extended highs and lows.
They excel at recording instruments from a greater distance than dynamic mics. Recording at a distance lets you capture the room’s ambiance which can be an important aspect of an instrument’s sound, especially acoustic instruments.
Because these mics require the use a power supply (see below), these mics output higher gain which leads to quieter recordings, plus the ability to record soft sounds accurately and with little noise.
Top condenser mic brands like Neumann, Blue, and AKG can be quite expensive!
There are two types of condenser mics – large diaphragm and small diaphragm.
Microphones pick up sound through their diaphragms. The size of the diaphragm is a major factor in a mic’s sensitivity, dynamic range, noise floor and SPL (sound pressure level) threshold.
Large diaphragm condenser mics have a diaphragm of 1” or larger. These are the large mics that you almost always see in pictures of a vocalist recording in a studio.
Large diaphragm mics are considered more accurate and detailed than small diaphragm condenser mics.
They are best used when you need low noise, high input sensitivity, and strong low-frequency response.
Large diaphragm mics frequently include multiple polar patterns (see the upcoming section for definitions).
Small diaphragm condenser mics have a diaphragm of under 1”.
These mics only come with one polar pattern.
Many small diaphragm mics come housed in a thin long tube and are known as “pencil mics”. Their thin and compact design allows them to be used in tight places where larger mics won’t fit.
They have a greater high-frequency range and a flatter frequency response than their large diaphragm counterparts and are excellent at picking up details, fast attacks (transients) and high frequencies.
They also are able to handle high SPLs, so they are mics of choice for miking loud guitar cabinets and snare drums.
Both large and small diaphragm condenser mics require a power source.
While some mics use batteries as the power source, a 48-volt external phantom power supply is a more reliable and efficient method.
Most mixing boards or mic preamps provide phantom power, so this is not something you need to worry about. But if needed, there are inexpensive phantom power supplies available that start around $20.00.
And finally, external phantom power does not require any extra cables – the power is supplied through the mic’s XLR cable.
Condenser mics are popular first choices for:
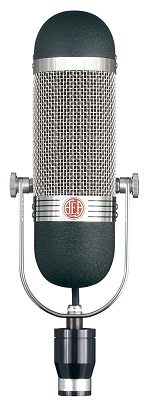
AEA R84 ribbon mic
Ribbon microphones are known in the industry as being the “elite” class of mics.
When the ribbon mic was introduced in the early 1930s, it offered the highest resolution and fidelity of any recording or broadcast microphone available at the time.
Its reputation as the warmest and the most natural sounding mic was created by countless recordings in the 1940s through 1960s by Bing Crosby, Frank Sinatra, Elvis Presley, Johnny Cash and others that are now classics.
Today, producers and engineers use ribbon mics to record acoustic instruments, drums, wind instruments, harp, vocals and more. They value ribbons as a good counterpoint to the “coldness” of digital recording technology by adding their characteristic sonic warmth.
Ribbon mics work in a similar way to dynamic mics, except that the diaphragm and voice coil are replaced with a strip of extremely thin aluminum foil. The surrounding magnet causes this ribbon of aluminum to move in response to sound waves.
Though ribbon mics were very common in the early days of recording and pro studios continue to use them, they are not common in home studios.
The main reason is that they are quite expensive compared to other types of mics.
Ribbon mics are also quite fragile; you should never blow into a ribbon mic as the aluminum ribbon can be easily damaged.
Counterintuitively, ribbon mics are frequently used on loud sound sources like electric guitar amps or as close mics for trumpets or other loud brass instruments, or with screamer vocalists.
Also, a ribbon mic should never be connected with phantom power on; it is a sure way to damage the mic.
In general, ribbons have a relatively flat frequency response and produce a full warm sound that many call “retro”.
Ribbon mic recordings are often described as silky, smooth and very detailed. This is due to the fact that a ribbon mic’s design creates a roll off on the higher frequencies, making the highs sound smooth and even.
Just listen to any classic songs by Bing Crosby to hear the velvety smoothness that a ribbon mic brings to a recording.
Bing Crosby – Swinging on a Star
Due to their extremely thin ribbon element, they are able to capture very small changes in dynamics and harmonics during a performance. For this reason, audiophile recordists love ribbon mics!
Vocals and instruments that might sound too harsh with a condenser or dynamic mic usually sound smooth and even through a ribbon mic.
Ribbon mics are best used for recordings where you want to capture the room’s ambiance. The ribbon’s bidirectional design will pick up the room’s sound behind the mic.
Ribbons excel as drum overheads, softening the top end while providing full-bodied lows and mids, and overall adding a natural balanced uncolored sound.
Ribbon mics are popular choices for:
No matter what mic you decide to use for the job, you need to understand the mic’s pickup pattern, also known as its polar pattern.
A mic’s polar pattern refers to the direction or directions that the mic picks up sound. Understanding these patterns will help you select the right mic that will give you the results you are looking for.
Here’s a tutorial on the different types.
Hearing The Different Mic Polar Patterns

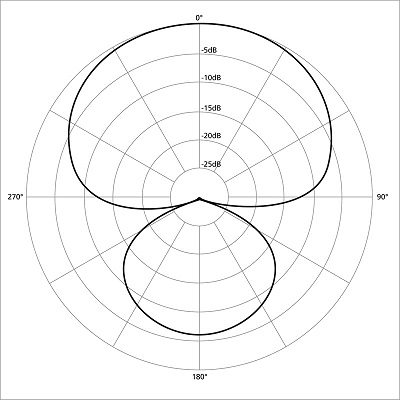
Cardioid Polar Pattern
Cardioid is the most common mic polar pattern. The word cardioid means “heart-shaped” and that is the pattern that sound is picked up by the mic.
As you can see from the diagram, a cardioid polar pattern primarily captures everything in front of the mic (the front of the mic is at the top with the 0 degrees marking). Less sound from the sides is picked up, and most sound in the rear of the mic is not picked up.
The cardioid pattern is suited to close-miking where you want to feature the sound source only and minimize the room’s effect on the recording.
Hypercardioid Polar Pattern
The hyper/super cardioid pattern has a much tighter focus than the cardioid pattern. This polar pattern picks up only what is narrowly in front of the mic, and it will reject most sound from the sides and rear.
Because the sweet spot for getting the best sound is small, the super cardioid pattern is most often used for isolating sound in a noisy environment.
Supercardioid mics and shotgun mics (even more narrowly focused) are used frequently by filmmakers and in TV production for location sound recording. They are used much less in music recording.
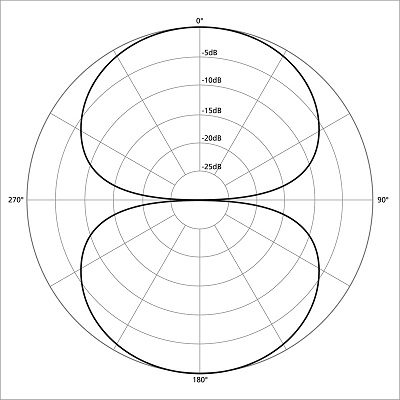
Figure-8 Polar Pattern
A bidirectional, or figure-8, polar mic pattern picks up sounds only from both sides of the mic’s diaphragm, that is, only sounds that are in front and behind the mic. It rejects most sounds from the sides of the mic.
The figure-8 pattern is used to record instruments in close proximity to each other while maintaining separation when mixing, or for interviews with two people where you want to maintain some separation.
Ribbon mics are by design bidirectional. These mics are frequently used in stereo recordings using the Blumlein Pair and Mid-Side recording techniques.
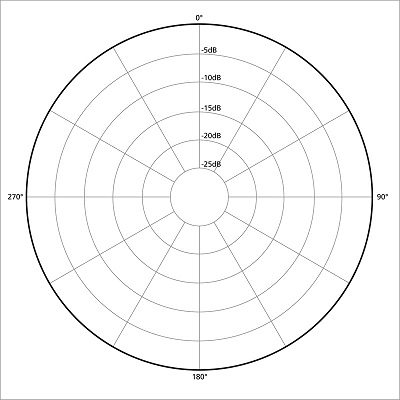
Omnidirectional Polar Pattern
Omnidirectional mics pick up sound from all sides equally.
Two typical uses for a mic in omni mode is to record not only the sound source (vocalists, instruments, etc.) but also the room ambiance. It is used for recording orchestras and choirs where the room’s acoustics (like in an old church) are an integral part of the overall sound.
The other typical use of the omni polar pattern is when you are recording in stereo.
Polar Patterns By Mic Type
Most microphones exhibit a change in sound quality depending on how close they are to the sound source.
The proximity effect is an audio phenomenon where the low-frequency response increases the closer the mic is to the sound source. If you have ever spoken into any mic you’ve noticed how much louder and deeper your voice gets as you move the mic closer to your mouth.
Rap and hip hop artists use the proximity effect frequently in their recordings to get a rich deep vocal tone.
Cardioid mics exhibit the proximity effect more than other mics. To reduce this effect, many mics have a user-selectable high pass filter that allows you to cut off the low frequencies, usually at 75 Hz or 80 Hz.
How The Proximity Effect Works
Every microphone manufacturer provides a graph that shows the frequency response curve for their microphones.
Though this can look pretty technical and intimidating to non-techies, it is important to understand that a mic’s frequency response can tell you at a glance if the mic is a good choice for a particular recording session or not.
For example, the Shure SM57 has a frequency response of 40 Hz–15 kHz.
What the chart tells you is how the mic actually responds in this frequency range.
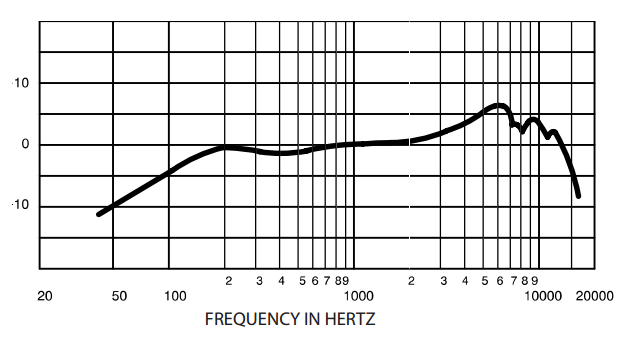
First, the mic does not have a flat frequency response. You can see that the mic tapers off on frequencies below about 200Hz, and has a bump in the highs around 6kHz. The mic then really falls off from 8 kHz to 15 kHz.
What this chart tells you is this: an SM57 would not be a good choice if you are looking to record instruments with wide frequency ranges. The lows and highs are not strong enough to get a full frequency recording.
However, it is a great mic if you want to record sounds without lots of lows and if you want to emphasize the 4 kHz to 6 kHz frequencies that brighten up a sound and provide presence.
That frequency emphasis is precisely why the SM57 is the #1 choice of guitar amp mic. Its frequency response helps create a fat punchy sound that engineers and producers expect when recording guitars. The high boost in the mic gives the guitar more energy and presence.
NOTE: All of my mic reviews include frequency response graphs for reference.
Most microphones are able to handle a certain amount of sound level before they start to distort. That level of sound is known as the sound pressure level (SPL) and is measured in decibels (dB).
A mic’s SPL limit is generally not an issue until you want to record a loud sound source at close range.
Dynamic mics by design are able to handle loud sound levels, usually well in excess of 130 dB. For reference, 130 dB is equal to a military jet take-off from an aircraft carrier with the listener only 50 feet away. That is VERY loud!
Condenser mics are much more delicate, and usually contain a pad switch which allows for a reduction in signal in 10 dB increments. This helps protect the diaphragm from excessive SPLs that can distort it or actually damage it.
To measure how loud a sound source is, you can use a sound pressure level meter (SPL meter). The cheapest way is to download a free app on your smartphone which will work just great, or you can purchase a handheld unit which is probably more accurate.
You’ve now learned the three different types of microphones, their strengths and best uses, polar pattern definitions, how to understand a mic’s frequency response and more.
Armed with this knowledge you should feel confident in being able to choose the right microphones for your studio.
Check out my complete series of microphone articles: